Hidden water leaks are like silent saboteurs, stealthily infiltrating your home and causing damage while remaining out of sight. Just as a skilled detective uncovers clues to solve a complex mystery, homeowners must become plumbing sleuths to track down these elusive leaks. The journey to find and fix a hidden water leak in an old house can be challenging, but with the right knowledge and tools, it’s a task that can save you thousands of dollars and protect your home from severe damage.
According to the Environmental Protection Agency, the average household’s leaks can account for nearly 10,000 gallons of water wasted every year, and 10 percent of homes have leaks that waste 90 gallons or more per day. This staggering statistic underscores the importance of addressing hidden leaks promptly and effectively.
Identifying Signs of Hidden Water Leaks
Hidden water leaks often reveal themselves through subtle indicators. As a homeowner, it’s crucial to be vigilant and observant of these signs:
- Unexplained Increase in Water Bills: A sudden spike in your water bill without a corresponding change in usage patterns is one of the most telltale signs of a hidden leak. Keep track of your monthly water consumption and investigate any unusual increases.
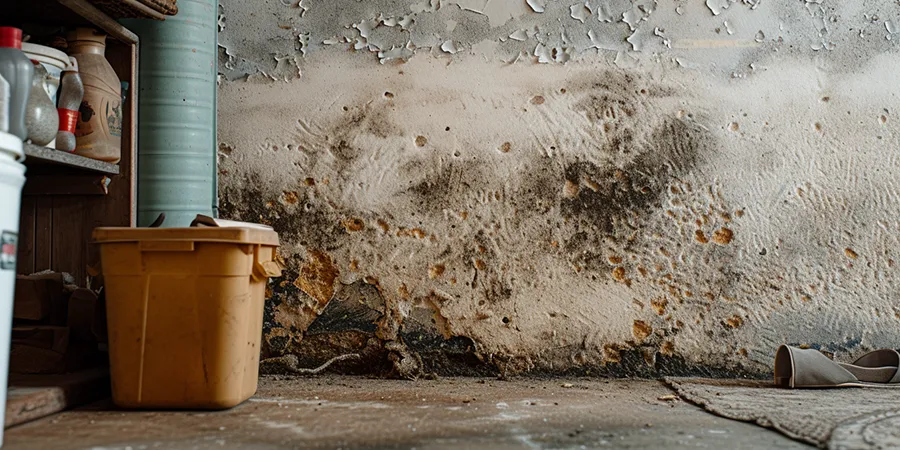
- Damp or Discolored Walls: Water stains, peeling paint, or warped surfaces can indicate a leak within the walls. Pay close attention to areas around plumbing fixtures, such as bathrooms and kitchens.
- Musty Odors: Persistent musty smells, especially in bathrooms, basements, or rarely used rooms, may signal hidden moisture. These odors are often accompanied by mold growth, which thrives in damp environments.
- Sound of Running Water: If you hear water running when all faucets are off, it could indicate a leak in your plumbing system. This sound might be particularly noticeable at night when the house is quiet.
- Mold Growth: Unexplained mold patches, particularly in typically dry areas, often point to hidden leaks. Look for mold in corners, behind furniture, or in closets.
- Warm Spots on Floors: For homes with radiant heating systems, warm spots on the floor might indicate a leak in the system. Use your bare feet to feel for unusual warm areas.
- Cracks in Foundation: While not all foundation cracks are caused by water leaks, persistent moisture can lead to foundation issues. Inspect your home’s foundation regularly for new or expanding cracks.
- Unusually Lush Vegetation: If certain areas of your lawn are unusually green or have faster-growing grass, it might indicate a leak in your underground water line feeding those areas.
- Water Meter Movement: When all water sources are turned off, check your water meter. If it’s still moving, you likely have a leak somewhere in your system.
- Sagging Ceilings or Floors: In severe cases, hidden leaks can cause ceilings or floors to sag due to water damage. This is a serious sign that requires immediate attention.
Leak Detection Techniques
Once you suspect a hidden leak, the next step is to locate it. There are both DIY methods and professional techniques available for leak detection.
DIY Methods
- Water Meter Test:
- Turn off all water sources in your home, including faucets, dishwashers, and washing machines.
- Locate your water meter and note the exact reading.
- Wait for at least 2 hours without using any water in your home.
- Check the meter again. If it has moved, you likely have a leak.
- Food Coloring Test for Toilets:
- Remove the toilet tank lid.
- Add a few drops of food coloring to the tank.
- Wait 15-20 minutes without flushing.
- If color appears in the toilet bowl, there’s a leak in the flush valve or flapper.
- Visual Inspection:
- Check visible pipes under sinks, in basements, and crawl spaces for signs of corrosion, green patina on copper pipes, or white calcium buildup.
- Inspect ceilings and walls for water stains, bubbling paint, or warped surfaces.
- Look for puddles around the base of toilets, tubs, or water heaters.
- Infrared Camera:
- Use a thermal imaging camera to detect temperature differences that might indicate a leak.
- Cold spots on walls or ceilings can indicate water intrusion.
- This method is particularly useful for detecting leaks behind walls or under floors.
- Moisture Meter:
- Use a moisture meter to check suspicious areas for elevated moisture levels.
- This tool can help confirm if a damp-looking area is actually wet.
Professional Techniques
- Acoustic Leak Detection:
- Professionals use sensitive listening devices to hear the sound of water escaping from pipes.
- This method is non-invasive and can detect leaks in walls and underground pipes.
- Video Pipe Inspection:
- A small camera is inserted into pipes to visually inspect for leaks, cracks, or other damage.
- This method is particularly useful for sewer lines and other hard-to-reach areas.
- Pressure Testing:
- The plumbing system is pressurized to detect drops in pressure that indicate leaks.
- This method can help locate leaks in specific sections of the plumbing system.
- Tracer Gas Detection:
- Non-toxic gas (usually hydrogen or helium) is introduced into the plumbing system.
- Special detectors are used to find where the gas escapes, indicating the location of leaks.
- Ground Penetrating Radar (GPR):
- GPR can be used to detect underground leaks without excavation.
- It’s particularly useful for finding leaks in water mains and sewer lines.
Repairing Hidden Leaks
Once you’ve located the leak, the repair method will depend on its location and severity. Here’s a guide to help you through the repair process:
Materials Needed
- Pipe repair clamps
- Epoxy putty
- Pipe cutter
- Replacement pipe sections
- Pipe joints and fittings
- Plumber’s tape
- Soldering equipment (for copper pipes)
- PVC cement (for plastic pipes)
- Adjustable wrench
- Screwdriver set
- Bucket and towels
Repair Steps
- Shut off the water supply: Before starting any repair, turn off the main water supply to your home or the specific shut-off valve for the affected area.
- Drain the pipes: Open faucets to drain water from the pipes you’ll be working on.
- Assess the leak:
- For small leaks in accessible pipes, a pipe repair clamp or epoxy putty can serve as a temporary fix.
- For more severe leaks or those in inaccessible areas, you may need to cut out the damaged section and replace it.
- Temporary fixes:
- For a small pinhole leak, apply epoxy putty directly over the hole.
- For slightly larger leaks, use a pipe repair clamp. Clean the pipe, place the rubber gasket over the leak, and tighten the clamp around it.
- Permanent repairs:
- Cut out the damaged section of pipe using a pipe cutter.
- Measure and cut a replacement section of pipe.
- For copper pipes, use a fitting brush to clean the inside of the fittings and the outside of the pipe ends. Apply flux and solder the new section in place.
- For PVC pipes, use PVC primer and cement to attach the new section and fittings.
- Check for additional leaks: Once the repair is complete, slowly turn the water back on and check for any remaining leaks.
- Clean up: Wipe down the repaired area and surrounding surfaces to remove any water or debris.
Safety Precautions
When dealing with hidden water leaks, safety should always be your top priority. Here are some essential precautions to take:
- Turn off electricity: If water is near electrical outlets or appliances, turn off the power to that area at the circuit breaker.
- Wear protective gear: Always wear gloves, safety glasses, and appropriate footwear to protect yourself from sharp edges and potential contaminants.
- Be cautious of mold: If you suspect mold growth, wear a respirator mask to avoid inhaling spores.
- Use proper tools: Ensure you’re using the right tools for the job to prevent injury and ensure effective repairs.
- Ventilate the area: When using adhesives or solvents, ensure proper ventilation to avoid inhaling fumes.
- Know your limits: For major leaks, those in inaccessible areas, or if you’re unsure about any step of the process, consult a professional plumber.
Preventing Future Leaks
Prevention is always better than cure. Here are some strategies to help prevent future hidden water leaks:
- Regular inspections: Conduct visual inspections of your plumbing system at least twice a year. Look for signs of corrosion, dampness, or discoloration.
- Maintain proper water pressure: High water pressure can strain pipes and joints. Use a pressure regulator to keep your home’s water pressure between 40-80 psi.
- Insulate pipes: In colder climates, insulate pipes in unheated areas to prevent freezing and bursting.
- Soften hard water: If you have hard water, consider installing a water softener to reduce mineral buildup in pipes and appliances.
- Be mindful of what goes down drains: Avoid flushing non-biodegradable items or pouring grease down drains to prevent clogs that can lead to leaks.
- Address small issues promptly: Don’t ignore minor leaks or drips. Fixing them early can prevent more significant problems down the line.
- Update old plumbing: If your home has outdated plumbing materials like galvanized steel, consider upgrading to more durable options like copper or PEX.
- Install water detection devices: Place water sensors near prone areas like water heaters, washing machines, and under sinks to alert you of leaks early.
- Schedule professional inspections: Have a licensed plumber inspect your plumbing system annually to catch potential issues before they become major problems.
FAQs
Q: How often should I check for hidden leaks?
A: Conduct a visual inspection monthly and perform a water meter test quarterly. Additionally, be vigilant about sudden changes in your water bill or the appearance of damp spots.
Q: Can tree roots cause hidden leaks?
A: Yes, tree roots can infiltrate and damage underground pipes, causing leaks. This is especially common in older homes with mature trees nearby.
Q: Are smart water monitors effective in detecting leaks?
A: Smart water monitors can be very effective in detecting unusual water usage patterns that may indicate leaks. They can provide real-time data and alerts, helping you catch leaks early.
Q: How can I tell if a leak is coming from my plumbing or my roof?
A: Roof leaks typically show up on ceilings and exterior walls, often leaving brown stains. Plumbing leaks are more likely to appear on interior walls, floors, or around fixtures. However, a professional inspection may be necessary to determine the exact source.
Q: Is it worth fixing a small leak, or should I wait until it gets worse?
A: Always fix leaks as soon as you detect them. Small leaks can quickly become larger, causing more damage and wasting more water. Early intervention is key to preventing costly repairs.
Conclusion
Hidden water leaks can be a homeowner’s worst nightmare, silently causing damage and wasting precious resources. However, with vigilance, the right techniques, and prompt action, they can be detected and repaired before causing extensive damage. Remember, early detection is key to preventing costly repairs and conserving water.
By understanding the signs of hidden leaks, mastering detection techniques, and knowing how to address these issues, you’re well-equipped to protect your home from the silent saboteurs of hidden water leaks. Share your leak detection experiences or tips on social media to help others protect their homes from hidden water damage. Together, we can raise awareness about the importance of leak detection and water conservation in our communities.