Introduction
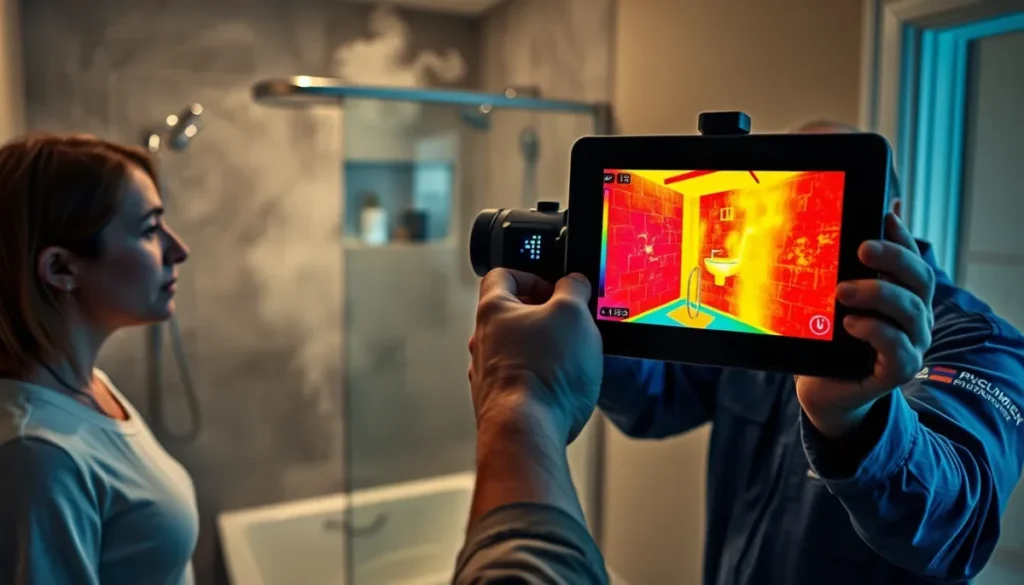
In the realm of home maintenance, few issues are as insidious and potentially damaging as hidden plumbing leaks. These silent culprits can wreak havoc on your property, leading to water waste, structural damage, and skyrocketing utility bills. But fear not, for modern technology has gifted us with a powerful tool in the fight against concealed water damage: thermal imaging.
Did you know that hidden water leaks can waste up to 10,000 gallons of water per year in the average household? According to the Environmental Protection Agency (EPA), fixing easily corrected household water leaks can save homeowners about 10 percent on their water bills. This staggering statistic underscores the importance of early leak detection and the potential impact of thermal imaging technology in home maintenance.
In this comprehensive guide, we’ll delve deep into the world of thermal imaging for plumbing leak detection, equipping you with the knowledge and skills to become your home’s first line of defense against hidden water damage. Whether you’re a curious homeowner or a budding DIY enthusiast, this article will walk you through the principles, techniques, and best practices of using thermal imaging cameras to identify and locate concealed plumbing issues.
Understanding Thermal Imaging for Leak Detection
The Science Behind Thermal Imaging
Thermal imaging, also known as infrared thermography, is a technology that detects and measures the infrared radiation emitted by objects. Every object with a temperature above absolute zero emits infrared radiation, which is invisible to the naked eye but can be captured and visualized using specialized cameras.
Thermal imaging cameras convert these temperature differences into visible images, creating a heat map of the area being observed. In the context of plumbing leak detection, this technology allows us to see temperature variations caused by water seepage or moisture accumulation, which would otherwise remain hidden behind walls, under floors, or within ceilings.
Principles of Leak Detection Using Thermal Imaging
When it comes to identifying plumbing leaks, thermal imaging capitalizes on several key principles:
- Heat Absorption and Retention: Water has a high specific heat capacity, meaning it can absorb and retain heat more effectively than many building materials. This property causes wet areas to appear cooler than their surroundings in thermal images.
- Temperature Differentials: Leaks create temperature variations in the affected areas. These differences can be detected and visualized by thermal cameras, often appearing as cool spots or patterns.
- Material Emissivity: Different materials emit infrared radiation at different rates. Understanding the emissivity of common building materials is crucial for accurate temperature readings and leak identification.
- Thermal Patterns: Plumbing leaks often create distinctive thermal patterns that can be recognized with practice. These patterns may follow the path of pipes or spread out from a central point of leakage.
By leveraging these principles, thermal imaging provides a non-invasive, efficient method for detecting hidden plumbing leaks in older system plumbing systems, allowing homeowners to address issues before they escalate into major problems.
Essential Equipment for Thermal Imaging Leak Detection
Before diving into the practical aspects of using thermal imaging for leak detection, it’s important to familiarize yourself with the essential equipment:
- Thermal Imaging Camera: The cornerstone of your leak detection toolkit. Look for a model with good thermal sensitivity (measured in mK) and adequate resolution for detailed images.
- Digital Camera: Used in conjunction with the thermal camera to take visible light images for comparison and documentation.
- Moisture Meter: While not strictly necessary for thermal imaging, a moisture meter can provide confirmatory readings in suspected leak areas.
- Notepad and Pen: For documenting observations, temperatures, and locations of potential leaks.
- Ladder or Step Stool: To access higher areas for comprehensive scanning.
- Personal Protective Equipment (PPE): Safety glasses and gloves are recommended, especially when working in cramped or dusty spaces.
Investing in quality equipment will significantly enhance your ability to detect and diagnose plumbing leaks accurately.
Step-by-Step Guide to Using a Thermal Imaging Camera for Leak Detection
Now that we understand the principles and have our equipment ready, let’s walk through the process of using a thermal imaging camera to identify hidden plumbing leaks in an older system plumbing system.
Prepare the Area
Before beginning your thermal scan, it’s crucial to prepare the area for optimal results:
- Clear the space of any obstructions that might interfere with your scan or create false readings.
- Ensure optimal temperature conditions. Early morning or evening are often ideal times for thermal imaging, as the temperature differential between the building interior and exterior is typically greatest.
- Turn off heating or cooling systems at least 4 hours before the scan to allow surfaces to reach equilibrium temperature.
- Remove or cover reflective surfaces that might create false readings.
Set Up the Thermal Imaging Camera
Proper setup of your thermal imaging camera is essential for accurate results:
- Turn on the device and allow it to calibrate according to the manufacturer’s instructions.
- Adjust the emissivity settings. For most building materials, an emissivity setting of 0.95 is appropriate.
- Set the temperature range based on the expected temperatures in your environment.
- Familiarize yourself with the camera’s controls and display features.
Scanning Techniques
Effective scanning is key to identifying potential leaks:
- Hold the camera steady, approximately 3 feet from the surface being scanned.
- Scan systematically, moving slowly across walls, floors, and ceilings.
- Pay extra attention to corners, joints, and areas around plumbing fixtures.
- Use a consistent scanning pattern to ensure complete coverage of the area.
- Adjust the camera’s focus as needed to capture clear, detailed images.
Interpreting Thermal Images
Understanding what you’re seeing is crucial for accurate leak detection:
- Look for cool spots (usually appearing blue or purple in thermal images) in unexpected areas.
- Observe patterns: straight lines may indicate pipe leaks, while irregular shapes could suggest general moisture issues.
- Compare thermal images with visible light images to correlate thermal anomalies with physical features.
- Be aware of potential false positives, such as cold air infiltration or recent water use.
Documenting Findings
Proper documentation is essential for follow-up and potential repairs:
- Take thermal images of suspicious areas from multiple angles.
- Capture corresponding visible light images for reference.
- Note the location, size, and shape of any thermal anomalies.
- Record ambient temperature and any relevant environmental conditions.
Confirming Leaks
While thermal imaging is a powerful tool, it’s important to confirm suspected leaks:
- Use a moisture meter to verify the presence of excess moisture in areas of concern.
- Listen for the sound of running water in walls or floors when all fixtures are turned off.
- Look for visible signs of water damage, such as stains, mold, or warping.
Identifying Common Signs of Hidden Leaks
As you conduct your thermal imaging survey, be on the lookout for these common indicators of hidden plumbing leaks:
- Cool Spots: Unexpectedly cool areas on walls, floors, or ceilings often indicate water presence.
- Linear Patterns: Straight lines of cooler temperatures may suggest leaking pipes within walls or under floors.
- Circular Patterns: Round or oval cool spots could indicate point-source leaks or drips.
- Moisture Accumulation: Areas of general coolness, especially in basements or crawl spaces, may suggest ongoing water seepage.
- Temperature Gradients: Gradual changes in temperature radiating from a central point can indicate slow leaks or moisture spread.
Distinguishing Leaks from Other Heat Sources
To avoid false positives, it’s important to differentiate plumbing leaks from other sources of temperature variation:
- Electrical Issues: Unlike plumbing leaks, electrical problems typically appear as hot spots in thermal images.
- Insulation Gaps: Poor insulation can create cool spots but usually follows more regular patterns than leaks.
- Thermal Bridging: Building materials with different thermal properties can create temperature variations that might be mistaken for leaks.
- Recent Water Use: Areas near recently used plumbing fixtures may appear cooler due to normal water flow.
Advanced Techniques for Thermal Imaging Leak Detection
As you become more proficient with thermal imaging, consider these advanced techniques to enhance your leak detection capabilities:
- Comparative Scanning: Take thermal images at different times of day to observe how temperature patterns change.
- Active Thermography: Introduce heat or cool air to the area to amplify temperature differentials and make leaks more apparent.
- Blower Door Testing: Combine thermal imaging with a blower door test to identify air leaks that may be contributing to moisture issues.
- 3D Thermal Mapping: Use specialized software to create three-dimensional thermal maps of your home for comprehensive leak analysis.
- Time-Lapse Thermal Imaging: Set up your camera to take images at regular intervals to track the progression of potential leaks over time.
Best Practices for Thermal Imaging Leak Detection
To maximize the effectiveness of your thermal imaging leak detection efforts, keep these best practices in mind:
- Regular Calibration: Ensure your thermal camera is properly calibrated according to the manufacturer’s recommendations.
- Consistent Methodology: Develop and follow a systematic approach to scanning your home for consistent results.
- Multiple Passes: Conduct multiple scans of areas of concern from different angles to confirm findings.
- Environmental Awareness: Be mindful of environmental factors that could affect your readings, such as sunlight, drafts, or recent water use.
- Continuous Learning: Stay updated on thermal imaging techniques and technologies through ongoing education and training.
- Professional Consultation: When in doubt, don’t hesitate to consult with a professional thermographer or plumbing specialist to confirm your findings.
The Future of Thermal Imaging in Home Maintenance
As technology continues to advance, the future of thermal imaging in home maintenance looks bright. Some exciting developments on the horizon include:
- Smartphone-Compatible Thermal Cameras: Making thermal imaging more accessible to homeowners.
- AI-Assisted Interpretation: Advanced algorithms to help identify and classify thermal anomalies automatically.
- Integration with Smart Home Systems: Thermal sensors that can continuously monitor for leaks and alert homeowners in real-time.
- Augmented Reality Applications: Overlaying thermal data onto real-world views for more intuitive leak detection.
These advancements promise to make thermal imaging an even more powerful and user-friendly tool for homeowners in the coming years.
FAQs
To further enhance your understanding of thermal imaging for leak detection, let’s address some frequently asked questions:
Q: Can thermal imaging detect all types of plumbing leaks?
A: While highly effective, thermal imaging may not detect very slow leaks or those in well-insulated areas. It’s best used in conjunction with other detection methods for comprehensive results.
Q: Do I need special training to use a thermal camera for leak detection?
A: Basic operation of a thermal camera is relatively straightforward, but interpreting results accurately may require some practice or professional guidance. Many manufacturers offer training courses or online resources to help users get started.
Q: How often should I perform thermal scans for leak detection in my home?
A: Annual scans are generally recommended for preventive maintenance. However, you may want to perform scans more frequently if you suspect ongoing issues or after any significant plumbing work.
Q: Can weather conditions affect the accuracy of thermal imaging for leak detection?
A: Yes, extreme weather conditions can impact thermal imaging results. Ideally, perform scans when there’s a moderate temperature difference between the interior and exterior of your home, and avoid scanning immediately after rain or in high humidity.
Q: Are there any limitations to using thermal imaging for leak detection?
A: Thermal imaging is a powerful tool, but it has limitations. It may not detect leaks deep within walls or in areas with significant insulation. Additionally, it requires proper interpretation of images to avoid false positives or negatives.
Conclusion: Empowering Homeowners with Thermal Imaging Technology
Thermal imaging has revolutionized the way we approach plumbing leak detection, offering homeowners a powerful, non-invasive method for identifying hidden issues before they escalate into costly disasters. By understanding the principles behind thermal imaging, mastering the techniques for using thermal cameras, and learning to interpret the results accurately, you can become your home’s first line of defense against hidden water damage.
Remember, while thermal cameras are incredibly useful tools, they are most effective when used as part of a comprehensive home maintenance strategy. Regular inspections, prompt attention to potential issues, and professional assessment when necessary are all crucial components of protecting your home from the ravages of hidden plumbing leaks.
We encourage you to put this knowledge into practice. Conduct your own thermal imaging survey of your home, paying particular attention to areas prone to leaks such as basements, bathrooms, and kitchens.
By embracing thermal imaging technology, you’re not just protecting your home – you’re joining a community of proactive homeowners committed to preserving their properties and conserving valuable resources. So grab that thermal camera, and start seeing your home in a whole new light!